GUEST COMPENDIUM
DeLonghi Radiator
BEDROOM
- King Bed
Please ensure you unwind the cord fully before turning the radiator on
Do not place any items on top of the heater while it’s in use.
The outside of the radiator will get hot, so keep away from children and pets.

Connection
Avoid contact between clothing, household linen, furniture, inflammable material and the socket providing power to the radiator.
Turning on
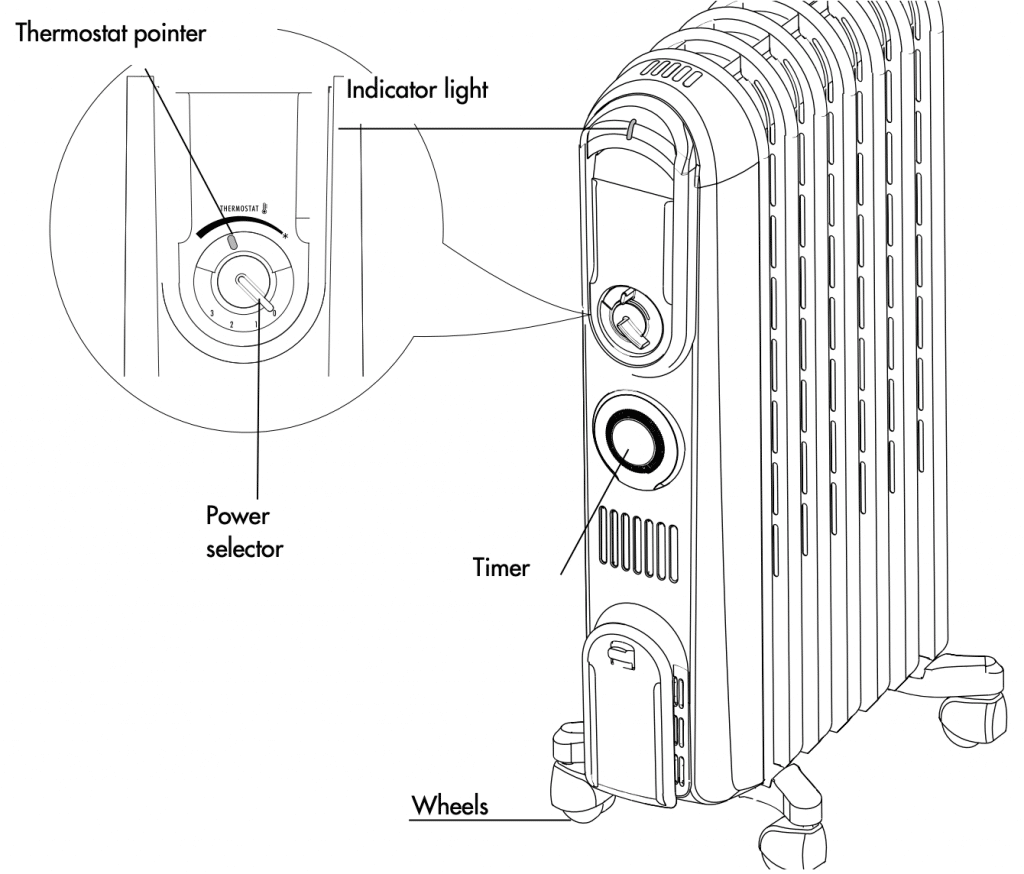
Plug into the mains, turn the thermostat pointer as far as it will go to maximum and turn the radiator on using the power selector as described below:
- Turn the power selector to 1 (minimum power) (the light comes on).
- Turn the power selector to 2 (medium power) (the light comes on).
- Turn the power selector to 3 (maximum power) (the light comes on).
NB: For economic operation, once the appliance has reached working temperature, you can use minimum or medium power (1 or 2).
Adjusting the thermostat
When the room has reached the required temperature, turn the thermostat slowly clockwise until a “click” is heard and no further.
The thermostat will automatically regulate the temperature set and keep it constant.
Frost protection function With the thermostat dial in the * position and one of the power levels selected, the appliance maintains room temperature at about 5°C, preventing freezing with minimal energy consumption.
NB: To turn the appliance off completely, turn the power selector to “0”.
Timer

Setting the clock
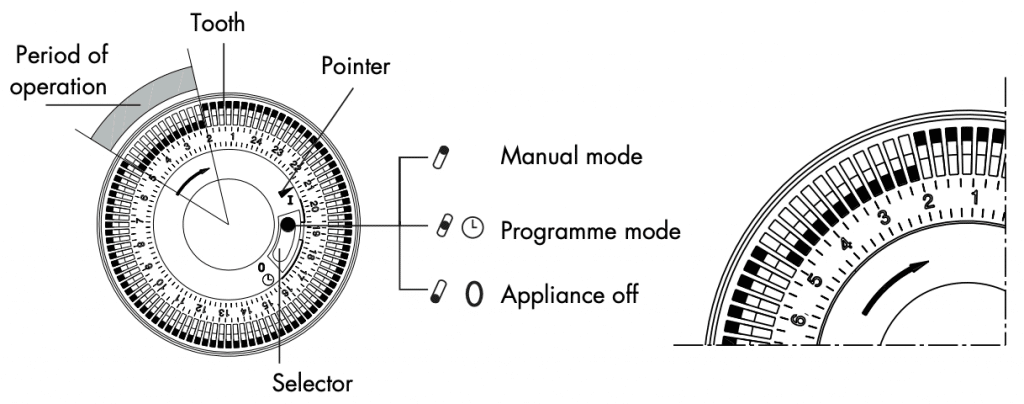
As with all clocks, the timer must be set to the exact time. For example, if it is 9.30 in the morning, turn the dial of the timer clockwise (in the direction of the arrow) until 9.30 is lined up with the pointer.
IMPORTANT: DO NOT TURN THE DIAL OF THE TIMER ANTICLOCKWISE.
The timer is an electric clock and works only if plugged into a socket. If disconnected, the timer stops and must be reset.
Setting the timer
The timer consists of 96 teeth, each representing a 15-minute period. The appliance can be programmed to come on and go off at set times.
With the timer, the appliance is programmed to within 15 minute intervals and you can programme up to 48 cycles (each cycle consists of a coming on and a going off time) during a 24 hour period).
The teeth can be pushed or pulled with your fingers. When a tooth is pushed towards the centre of the dial, the radiator remains in operation for those 15 minutes.
If the tooth is pulled away from the centre, the radiator is off during that period.
Using the timer
- Plug into the mains socket.
- Turn the dial clockwise to set the current time (see SETTING THE CLOCK).
- Push the teeth corresponding to the period you do not want the radiator to operate towards the outside. For example, the radiator in the figure will be on from 2.00 to 5.00.
- Turn the power selector to the required position (1, 2 or 3).
- Once the teeth have been set for the desired periods of heating, the radiator will come on and go off as set.
- While the radiator remains plugged into the socket, the timer retains the correct time.
Overriding the timer
To override out the timer, place the selector in the I position (see figure). To go back to programmed operation, place the selector in the position.
NB: when the selector is in the 0 position, the appliance is off.
In the I and 0 positions, the timer is still set to the current time.
Safety device
A safety device shuts the radiator down in the case of overheating. If shutdown occurs, the heater cannot be re-started.
